How to Patch Small Drywall Holes
by Admin
Posted on 27-01-2025 01:00 PM
Before delving into the step-by-step process of repairing holes in your
drywall
, let's discuss why it's crucial to address these issues promptly:
aesthetics: unsightly holes and blemishes on your walls can significantly diminish the overall appearance of your home. Repairing them restores the visual appeal of your living space. Structural integrity: holes in the wall can compromise the structural integrity of your home, especially if they're not repaired promptly.
 Properly patched drywall ensures that your walls remain sturdy. Energy efficiency: holes in the wall can also affect your home's energy efficiency. Gaps and openings can allow drafts to enter, leading to increased energy bills.
Let’s face it, not everyone can be a diy pro – especially when it comes to repairing or replacing water damaged drywall. But with the right guidance, even a novice can tackle this task like a pro. First things first, you need to assess the extent of the damage. If it’s just a small hole or crack, then patching it up would be your best bet. However, if the damage is extensive, then you’ll need to replace entire sections of your drywall. Once you’ve assessed the damage, gather the necessary tools for repairing waterlogged drywall, such as putty knives, sandpaper, joint compound, and paint.
How to Fix Large Drywall Holes
But don’t worry, if you need to see everything in picture form, i’ve got you covered below. Small screw holes, step by step
first, here’s how i tackled the small holes in the closet that were less than 1/2 an inch. For these, i used the 3m™ high strength small hole repair, all-in-one applicator tool.
This little gadget is so convenient because it has everything you need all in one tool – a sanding pad, primer enhanced spackle, and a putty knife all in one. This is one of those tools that’s nice to have in your toolbox or drawer in your home.
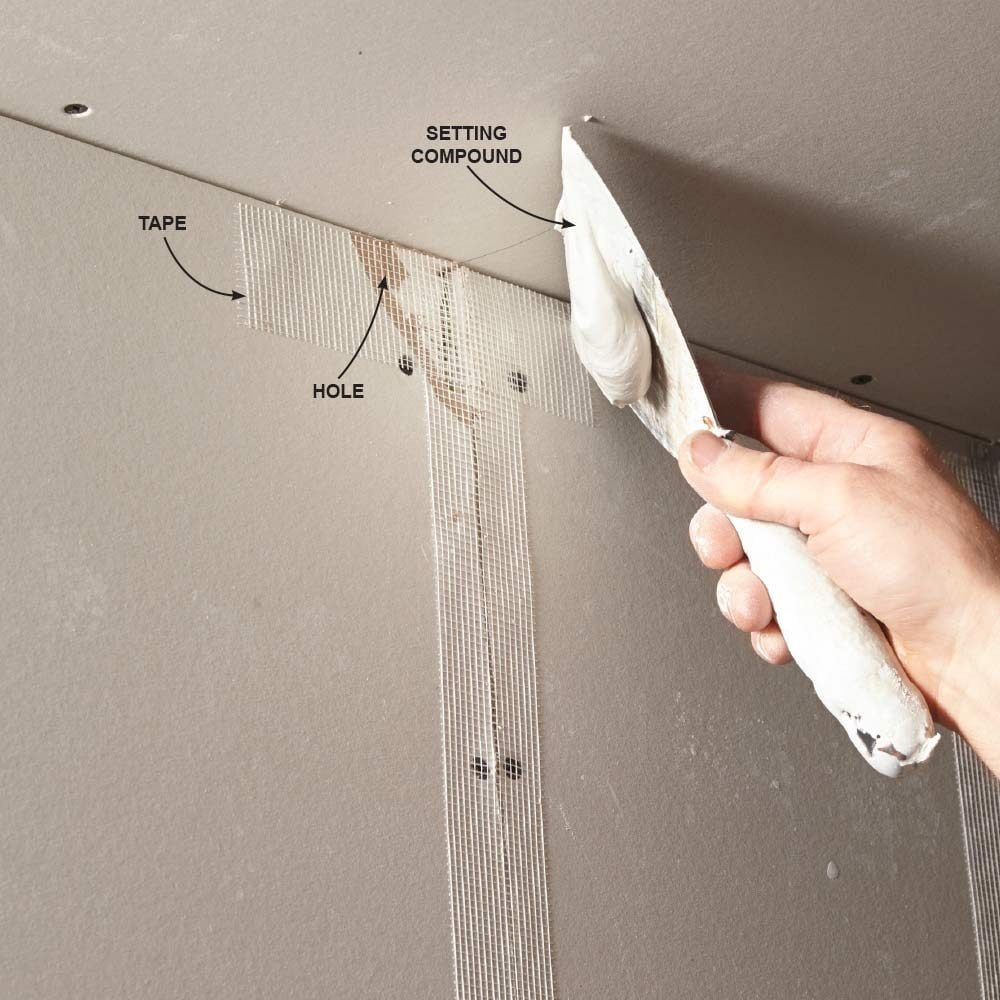
Updated on 2025-01-27 | written by joe leffew drywall is a popular wall and ceiling material that is prone to damage over time. Whether it’s a small hole, a crack, or a dent, drywall repair is something that every homeowner will have to tackle at some point. While hiring a professional may be an option, it can be expensive. Fortunately, there are some smart drywall repair tips and tricks that you can try on your own. In this blog, we’ll go over 5 of them. Use mesh tape for large holes if you have a large hole in your drywall, you’ll need something to hold the joint compound in place.
Cut Out Damaged Area
As mentioned above, the first method is through the use of stick-on patches. These types of patches are very easy and straightforward to use, as they don’t require cutting into the wall. All that’s necessary to start is to peel off the backing from the patch and press it firmly onto the damaged area of the wall. Once this is done, you are good to continue the patching process. The second method is a traditional installation method of drywall. To complete this method, you have to carefully measure the area that needs to be patched, cut out the damaged piece, and then fit a new piece back into place.
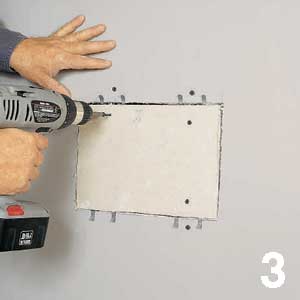
When it comes to holes that are larger than 4-inches in diameter, it is best to cut out the damaged area and replace it with a piece of cut-out sheetrock. This type of drywall is common in construction because it is safe to use. Sheetrock repair is an important part of your home improvement project.
having the right tools and materials is essential for a smooth sheetrock installation process. You will need more than just sheetrock panels. Tools such as a drywall saw, utility knife, tape measure, and a t-square are imperative for accurate measuring and cutting. Materials like drywall screws , joint tape, and joint compound will also be on your shopping list. Prepare your workspace by organizing all your tools and materials before starting. This organization will save you time and help avoid unnecessary interruptions during the installation process.
Now that you have all of your tools and material you’re ready to get started. First take your tape measure and measure however is most convenient for you to make a nice square around the patch. Next take your chalk box and snap lines in-between your marks, you should end up with a well defined square. With your keyhole saw in hand cut out your chalk lines so that when your done you have as close to a perfect square as you can. Make sure that you actually cut or score the drywall around the entire perimeter prior to removing the drywall.